 Happy New Year!!!
 It was love at first sight.
Introducing (drumroll please) ROXY~~~~
Our new puppy. She is a barrel of laughs, a truckload of smiles and a sea of sloppy kisses. Roxy is a six month Pit/English Pointer mix that is thrilled to have been rescued from the SPCA. She just dropped by to introduce herself~~ Don’t be surprised if you see her in some of my upcoming demos!!
I trust that you have stitched your way into many hearts over the holidays. Most of you have crafted delightful, personal surprises that put many smiles on the faces of those you love. I hope that you managed to take a few snapshots of your favorite pieces because now you can upload them to the HSN.com website! Dot Com has a forum to show off your creations. Don’t be shy. My first pair of pants had four fronts and I couldn’t get them over my ‘junk in the trunk’ but we all have to start somewhere?
HOW-TO
On HSN.com, click on your sewing machine and scroll down to DESCRIPTION. Next to that is a tab called PROJECTS. Click on projects and upload yours.
Did you make your list of New Year’s Resolutions? I make ONE every year. For me, that’s much more achievable than an entire list of changes. For example, in 2008 it was “Live In Truth” (you know, to quit saying YES, when I really felt like NO!) In 2009 it was “Fit and Fabulous” (couldn’t bear ‘fat and fifty!’) so I joined my local YMCA and here I am one year later still taking four classes a week and working with a personal trainer. OK, so I haven’t actually lost any weight BUT……Overall, I am much stronger and I’m feeling Fabulous—even with long hours sitting on my butt in the sewing studio!
This year, I have decided that my New Year’s Resolution will be “Focus and Finish” because there are no less than twenty-two ‘cut but not sewn’ apparel projects, three books/DVDs half way written and an incomplete decorative ceiling for my entranceway…. ( I figure that a mantra is better than ADD medication.) I’d be interested in hearing about your New Year’s Resolution(s) this year so we can cheer each other on~ I need all the help I can get!
EMBROIDERY
Time to dive into Futura’s world of ADVANCED EDITING software. Take a deep breath! Editing allows you creative control over your designs so you can tweak them exactly the way you want to. The list below shows you the difference between basic editing (which is built into the machines installation software) and advanced editing, (which is an optional and additional add-on software) this way you can decide if Advanced Editing is something you’d like to use in your machine embroideries.? If you don’t already own ADVANCED EDITING, pick it up today on HSN.com item # 434-549.
BASIC EDITING:
| ADVANCED EDITING:
|
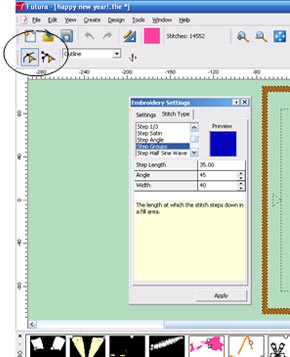
 To change the stitch type within a block:
 1) Click on the left editing icon.
2) Click on the block in your design that you would like to edit. The outline of the block should highlight.
 3) Right click inside the block and a window menu box will appear.
4) Choose and Click Embroidery Settings from the menu. A new window working box will appear.
5) Click on the Stitch Type tab.
6) Scroll though the settings and choose the one you like based on what you see in the preview window.
7) Click apply.
8) Right click and click ‘stitch it’ in the new window.
9) Click the editing icon again.
10) You can now go to VIEW and click Realistic View and it will show you on your screen what the block will look like with your chosen fill.

11) After you have completed all of the editing you would like to accomplish on a design, remember to save it!
Questions and Answers:
Q: When will HSN offer the extra software for those of us who already have a Futura?
A: We currently carry the following SINGER software items available here.(http://crafts-sewing.hsn.com/sewing-sewing-software-books_c-ct0168_xc.aspx)
You may purchase AUTOPUNCH, AUTO-CROSS STITCH, PHOTO STITCH, ADVANCED EDITING, 3900 DESIGN ANTHOLOGY and BERTINA/DARSTAR design CDs to go with your Singer Futura.
Q: How do I download designs to my stick drive to use on the Brother PE770 with USB port?
A:
1. Download a design in .pes from the internet site of your choice (Brother’s site is a great place to start)
2. Make sure you save this in a specific file that you make that you can easily access. Ex: My computer/ Local disc C/ Brother Downloads
3. Insert the USB drive into your computer and transfer the designs to your stick. Right Click on the design or file and ‘save to’ your USB stick.
4. Now insert the stick into your sewing machine and press the USB icon on the touch screen. Your designs should come up. You can scroll through and choose the one you want to stitch out
Next month I’ll begin featuring the Draw Package, an AutoPunch built in add-on that comes in handy for improving the look of embroidered clip art and even drawing your own embroidery designs! Stay warm and try to sew something you enjoy each day~ See you in February!
Sew Your New Year’s Dreams,


